Adding the Kii Cloud SDK
We will configure the Android Studio to leverage Kii Cloud.
Adding the Kii Cloud SDK
First, you need to add the Kii library to your project.
There are two ways to add the library.
We recommend your project to using Maven to let it fetch the remote Kii SDK library, but you can also download the AAR package file by yourself from the developer portal.
Downloading from the Maven repository
You can download the SDK from the Maven repository with Gradle.
First, add the following repositories to the top-level "settings.gradle" in the root project directory.
dependencyResolutionManagement {
  repositories {
    maven { url 'https://dl.cloudsmith.io/public/kii/kii-maven/maven' }
  }
}
Next, add the following dependencies in the "build.gradle" file that locates under the target module to build. The file should be under the "app" directory by default. The configuration to be added depends on the version of your Android Studio.
-
dependencies { implementation ('com.kii:cloud-sdk:XX.YY.ZZ'){ transitive=true } } -
dependencies {
  compile ('com.kii:cloud-sdk:XX.YY.ZZ'){
    transitive=true
  }
}
Please do not forget to change the XX.YY.ZZ in com.kii:cloud-sdk:XX.YY.ZZ with the actual version you want to download. You can check the latest version number by clicking the "Download" link in the developer portal.
Specify the version number with the above syntax for Version 2.4.12 or later. Use com.kii:cloud-sdk:XX.YY.ZZ:library@aar instead of com.kii:cloud-sdk:XX.YY.ZZ for Version 2.4.11 or earlier. If you upgrade the SDK from Version 2.4.11 or earlier to Version 2.4.12 or later, use com.kii:cloud-sdk:XX.YY.ZZ. You cannot use the previous syntax when you add Version 2.4.12 or later.
Manual downloading
First, download the library. Log in to the developer portal (https://developer.kii.com) and click the link of the SDK on the download page.
After downloading the library, please integrate it into your project as follows:
Copy the downloaded Kii library (android-cloud-sdk-vXX.YY.ZZ.aar) to your project's "libs" directory.
The directory is the "libs" under your module directory. It is "app/libs" by default.
Add the following in the "build.gradle" file that locates under the target module to build. The file should be under the "app" directory by default.
The configuration to be added depends on the version of your Android Studio.
-
repositories { flatDir { dirs 'libs' } } dependencies { implementation 'com.example.library:android-cloud-sdk-vXX.YY.ZZ@aar' implementation 'com.squareup.okhttp3:okhttp:3.10.0' implementation 'com.squareup.okhttp3:okhttp-apache:3.10.0' } -
repositories {
  flatDir {
    dirs 'libs'
  }
}

dependencies {
  compile 'com.example.library:android-cloud-sdk-vXX.YY.ZZ@aar'
  compile 'com.squareup.okhttp:okhttp:2.7.2'
  compile 'com.squareup.okhttp:okhttp-apache:2.7.2'
}
There are two parts in the above sample code:
- Add the "repositories."
- Add three "implementation" or "compile" lines in the "dependencies". Please do not forget to change the
XX.YY.ZZinandroid-cloud-sdk-vXX.YY.ZZ@aarwith the actual version of the file you've downloaded. You can leavecom.example.libraryas is.
Starting from Version 2.2.0, the Analytics SDK is integrated into the Cloud SDK. If you've upgraded the version, please remove
android-analytics-sdk-xxx@aarfrom the dependencies, or you will get an error. Also, please removeKiiAnalytics.initialize()from your code.Kii Cloud SDK uses an open source library named OkHttp for providing the HTTPS connections, so we are adding this dependency at the same time.
-
Extracting the JAR file
If you want to use the JAR file (e.g., compiling in a traditional way), you can extract the JAR file from the AAR file and add it to your project with the following steps:
Extract the android-cloud-sdk-vXX.YY.ZZ.aar file (the AAR file is a compressed file in the ZIP format).
Find the
classes.jarfile in the extracted directory and move it to your project library directory. This file is the library file of the Kii Cloud SDK.Download the dependency libraries OkHttp, OkHttpApache, and Okio and copy them to the project library directory.
Configuring your project
Follow the steps below to configure your project:
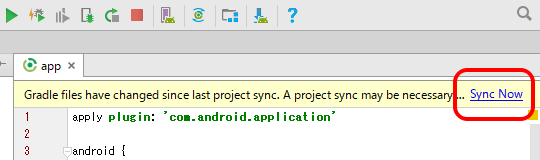
Sync your project.
The "Sync Now" link will be displayed if the project needs to be synchronized. Click the link to do so and then build the mobile app.
Now the Kii SDK symbols will be complemented.
Update the "AndroidManifest.xml" file to add the necessary permissions.
Add the following permission under the
manifest.<uses-permission android:name="android.permission.INTERNET" />Add either of the following permissions if your mobile app uploads/downloads files as object bodies and those files require access permissions. For the details on the READ_EXTERNAL_STORAGE/ WRITE_EXTERNAL_STORAGE permissions, please refer to the Android Reference.
If you are using Android 6.0 or later (API level 23 or later), you need to get permission at runtime in addition to configuring READ_EXTERNAL_STORAGE/WRITE_EXTERNAL_STORAGE. See Getting runtime permissions for more implementation details.
Add the permission below if only read access is required:
<uses-permission android:name="android.permission.READ_EXTERNAL_STORAGE" />Add the permission below if both read and write access is required:
<uses-permission android:name="android.permission.WRITE_EXTERNAL_STORAGE" />Add the service below if you use the analytics feature:
<application>
    <service android:name="com.kii.cloud.analytics.EventUploadService" />
</application>
Add the configuration below if you use Android 9.0 or later (API level 28 or later):
<application>
    <uses-library android:name="org.apache.http.legacy" android:required="false" />
</application>
Also, specify the application class name in the
nameattribute of theapplicationelement. The application class is the class that will be executed before the activity initialization, and this is where we want to initialize the SDK. In this example, we are setting the name asMobileApp.<application android:allowBackup="true" android:icon="@drawable/ic_launcher" android:label="@string/app_name" android:theme="@style/AppTheme" android:name=".MobileApp" >The AndroidManifest.xml should now look like this:
<?xml version="1.0" encoding="utf-8"?>
<manifest xmlns:android="http://schemas.android.com/apk/res/android"
    package="com.example.myapp" >

    <uses-permission android:name="android.permission.INTERNET" />

    <application
        android:allowBackup="true"
        android:icon="@drawable/ic_launcher"
        android:label="@string/app_name"
        android:theme="@style/AppTheme"
        android:name=".MobileApp" >

        <service android:name="com.kii.cloud.analytics.EventUploadService" />
     ...
Add the following code into your Application class to initialize the SDK.
Make sure to align the name of the application class with the name you've specified in the AndroidManifest.xml.
import com.kii.cloud.storage.*;
import android.app.Application;

// The MobileApp class should be declared in your mobile app's AndroidManifest.xml.
public class MobileApp extends Application {
  @Override
  public void onCreate() {
    super.onCreate();
    // Initialize the Kii Cloud SDK. Call this method before any other Kii SDK API calls.
    // This method can be called multiple times.
    Kii.initialize(getApplicationContext(), "___APPID___", "___APPKEY___", Kii.Site.JP, true);
  }
}
Insert your application's AppID in the placeholder
___APPID___. You can put an arbitrary value in the placeholder___APPKEY___.The fifth argument is set to true to enable the application analytics features. If you set this option false, you will not be able to use the analytics features (the mobile app launches a bit faster).
You can safely embed the AppID in your mobile app as long as you apply the correct access control. See Security for more information.
Setting Proguard
All the necessary settings for obfuscating the Kii Cloud SDK with Proguard are included in the SDK's AAR file, so you don't need to make any configuration for the obfuscation.