Getting the Data List
The user can list the entered income and expense entries and edit entries in the data listing screen. This topic explains the data listing process and the next topic explains the data editing process.
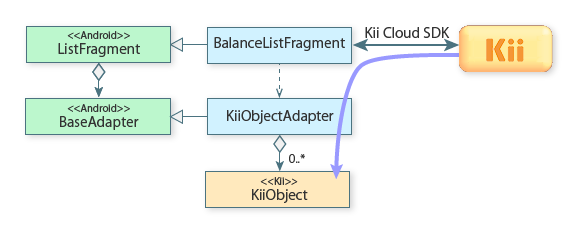
Class structure
The data listing screen consists of subclasses of the ListFragment class and the BaseAdapter class in the Android SDK as shown in the class diagram below.
The BalanceListFragment class accesses Kii Cloud and gets income and expense data as a list of KiiObjects. The obtained KiiObjects are stored in a KiiObjectAdapter object.
Check the following files for the source code.
Getting the data list
In the data listing screen, KiiObjects that store income and expense data are obtained from Kii Cloud.
The following two methods are mainly used for getting data from Kii Cloud. Kii Balance uses the first method.
-
Querying KiiObjects in a specific bucket
You get KiiObjects that match certain conditions in a batch. This method is suitable for the data listing screen.
-
Specifying the ID of a target KiiObject
You save the ID of a certain KiiObject and get the KiiObject with the saved ID. This method is not suitable for the data listing screen because ID management is required.
Data is obtained within the onActivityCreated() method. This method is called after the parent activity of the fragment is created.
The getItems() method actually gets data. See how the query is started in the code block below.
@Override
public void onActivityCreated(Bundle savedInstanceState) {
    super.onActivityCreated(savedInstanceState);
    ......
    getItems();
}

private void getItems() {
  KiiUser user = KiiUser.getCurrentUser();
  KiiBucket bucket = user.bucket(Constants.BUCKET_NAME);

  // Create a query instance.
  KiiQuery query = new KiiQuery();
  // Sort KiiObjects by the _created field.
  query.sortByAsc(Field._CREATED);

  final List<KiiObject> objectList = new ArrayList<KiiObject>();

  // Call the Kii Cloud API to query KiiObjects.
  ProgressDialogFragment.show(getActivity(), getFragmentManager(), R.string.loading);
  bucket.query(new KiiQueryCallBack<KiiObject>() {
    ......
  }, query);
}
The query gets all KiiObjects in the bucket in the ascending order of the creation time. The query is performed in the same way as that in Hello Kii. For more information, see the Hello Kii tutorial.
Pagination
Kii Balance provides a complete data listing feature by paginating the query result.
Pagination is the process of dividing the query result into pages and getting one page at a time, when the query result contains numerous items.
For example, if a query gets 420 KiiObjects, the result can be obtained in multiple pages as below.
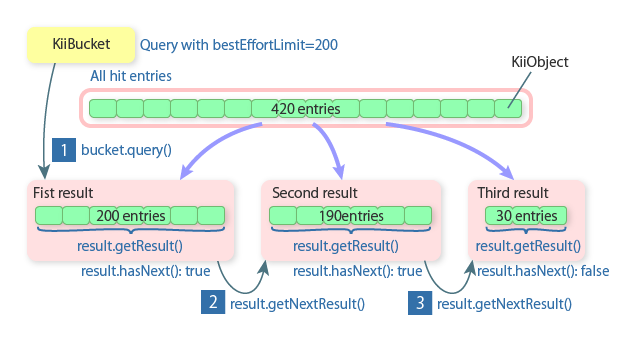
You can get up to 200 entries in one page because the default value of the bestEffortLimit option is 200. However, as shown in the second result, various conditions such as the transfer size can decrease the number of returned entries even if there is another or more pages to get. Additionally, the last page might contain no entry.
The APIs in the above figure return values as follows.
-
For the first page
The
query()method of theKiiBucketclass gets the first page ( ). The
 getResult()method of the obtainedresultinstance gets a list ofKiiObjectsas aList<KiiObject>instance. ThehasNext()returnstruebecause there are more pages to get. -
For the second page
The
getNextResult()method gets the second page from theresultinstance obtained for the first page ( ). As with the first query, the
 getResult()method gets aList<KiiObject>instance. ThehasNext()returnstruebecause there is another page to get. -
For the third page
The
getNextResult()method gets the third page from theresultinstance obtained for the second page ( ). The
 hasNext()method returnsfalse. It means there is no more page and all the entries are obtained.
See how pagination is performed in the code block below. This block shows how the query that was started in the previous sample code is executed.
private void getItems() {
  ......

  final List<KiiObject> objectList = new ArrayList<KiiObject>();

  // Call the Kii Cloud API to query KiiObjects.
  ProgressDialogFragment.show(getActivity(), getFragmentManager(), R.string.loading);
  bucket.query(new KiiQueryCallBack<KiiObject>() {
    @Override
    public void onQueryCompleted(int token, KiiQueryResult<KiiObject> result, Exception e) {
      super.onQueryCompleted(token, result, e);
      if (e != null) {
        ProgressDialogFragment.close(getFragmentManager());
        ViewUtil.showToast(getActivity(), ViewUtil.showToast(getActivity(), getString(R.string.error_query) + e.getMessage());
        return;
      }
      objectList.addAll(result.getResult());

      // Check if more KiiObjects exit.
      if (!result.hasNext()) {
        ProgressDialogFragment.close(getFragmentManager());
        KiiObjectAdapter adapter = (KiiObjectAdapter) getListAdapter();
        adapter.clear();
        for (KiiObject object : objectList) {
            adapter.add(object);
        }
        adapter.computeTotalAmount();
        adapter.notifyDataSetChanged();
        refreshTotalAmount();
        mAddButton.setVisibility(View.VISIBLE);
        return;
      }
      // Get the remaining KiiObjects.
      result.getNextQueryResult(this);
    }
  }, query);
}
Note the following key points of the above processing.
- Pagination is implemented by recursively calling the
onQueryCompleted()method of theKiiQueryCallBack<KiiObject>class. When theresult.getNextQueryResult()method gets the second and third pages,thisis specified as the callback so that theKiiQueryCallBack<KiiObject>instance used for getting the first page is recursively processed. - The
ProgressDialogFragmentclass displays the progress. The progress indicator disappears when an error occurs and the mobile app stops processing the subsequent pages or when all the entries are obtained. - In order to recover from a possible error, obtained
KiiObjectsare not directly added to aKiiObjectAdapterinstance. The query result is saved inobjectList, then added to aKiiObjectAdapterinstance in a batch when all the entries are obtained. SupposeKiiObjectswere directly added to aKiiObjectAdapterinstance. If an error occured while getting the second page, only the entries obtained in the first page would remain in theKiiObjectAdapterinstance.
In order to ensure the quality of your mobile app, pay attention to the recovery processing mentioned in the third key point. Instabilities such as signal quality on the smartphone cause API errors because network access is required for executing the Kii Cloud APIs.
When designing your mobile app, you need to not only create error messages but also consider how the user can recover from errors. If your scenarios are insufficient, the user might encounter data inconsistency and/or find no way to operate the mobile app. You can test the error case mentioned in the third key point by decreasing the page size with the query.setLimit() method and using a device in airplane mode in combination with breakpoints of the debugger.
If the list is obtained successfully, the obtained KiiObjects are added to a KiiObjectAdapter instance that is explained in the next section. Then the refreshTotalAmount() method displays the balance and the "+" button is enabled. If the list cannot be obtained, the mobile app displays a message prompting the user to refresh the list from the menu.
KiiObjectAdapter
The KiiObjectAdapter class inherits the BaseAdapter class and manages income and expense data in KiiObjects. It also saves the calculated balance in a field and responds to a query from the data listing screen.
The KiiObjectAdapter class has the following features. This topic does not cover these features in detail because every feature is implemented according to the basic implementation technique for an adapter. For the source code, see KiiObjectAdapter.
| Method | Inherited from the BaseAdapter class |
Description |
|---|---|---|
void add(KiiObject item) |
No | Adds a KiiObject. |
void updateObject(KiiObject object, String objectId) |
No | Updates the KiiObject that has the specified ID. |
int delete(String objectId) |
No | Deletes the KiiObject that has the specified ID. |
void clear() |
No | Deletes all KiiObjects. |
void computeTotalAmount() |
No | Calculates the balance. |
int getTotalAmount() |
No | Returns the balance. |
int getCount() |
Yes | Returns the number of registered KiiObjects. |
Object getItem(int position) |
Yes | Returns the KiiObject at the specified index number. |
long getItemId(int position) |
Yes | Always returns a dummy value of 0 for Kii Balance. |
View getView(int position, View convertView, ViewGroup parent) |
Yes | Returns a view to display on the screen. |
Creating a view
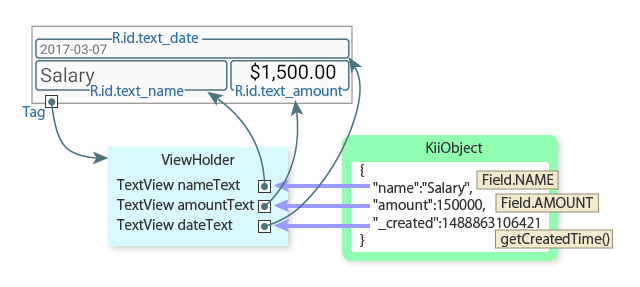
The getView() method creates and returns a view to display an entry.
As with Hello Kii, this method processes data stored in a KiiObject instance for display and returns a view for the entry according to the specification of the BaseAdapter class.
See how a view is created in Kii Balance in the code block below.
@Override
public View getView(int position, View convertView, ViewGroup parent) {
  if (convertView == null) {
    Context context = parent.getContext();
    LayoutInflater inflater = LayoutInflater.from(context);

    View layout = inflater.inflate(R.layout.list_item, null);

    // Set textViews to ViewHolder.
    TextView nameText = (TextView) layout.findViewById(R.id.text_name);
    TextView amountText = (TextView) layout.findViewById(R.id.text_amount);
    TextView dateText = (TextView) layout.findViewById(R.id.text_date);
    layout.setTag(new ViewHolder(nameText, amountText, dateText));

    convertView = layout;
  }
  ViewHolder holder = (ViewHolder) convertView.getTag();
  KiiObject object = items.get(position);

  TextView nameText = holder.nameText;
  nameText.setText(object.getString(Field.NAME));

  TextView amountText = holder.amountText;
  int type = object.getInt(Field.TYPE);
  if (type == Field.Type.INCOME) {
      amountText.setText(AMOUNT_FORMAT.format(object.getInt(Field.AMOUNT) / 100.0));
      amountText.setTextColor(Color.BLACK);
  } else {
      amountText.setText(AMOUNT_FORMAT.format(-object.getInt(Field.AMOUNT) / 100.0));
      amountText.setTextColor(Color.RED);
  }

  TextView dateText = holder.dateText;
  dateText.setText(DATE_FORMAT.format(new Date(object.getCreatedTime())));

  return convertView;
}

private static class ViewHolder {
  TextView nameText;
  TextView amountText;
  TextView dateText;
  ViewHolder(TextView nameText, TextView amountText, TextView dateText) {
    this.nameText = nameText;
    this.amountText = amountText;
    this.dateText = dateText;
  }
}
This code associates each field of a KiiObject instance with a display item. In order to improve the processing speed, the ViewHolder class is used for setting the results of the findViewById() method as a tag to the view.
What's Next?
Let us review how to edit entries in the data listing screen.
Go to Editing an Entry.