Implement Your Application
Now we will start implementing the initialization logic and the reception handler for push messages.
Overall structure
As mentioned at the beginning of this tutorial, this tutorial explains how to implement the push notification feature by using a modified version of the GCM sample code provided by Google. The sample code in the tutorial is customized for Kii Cloud while the original sample code is available from the link below:
Source code: https://github.com/googlesamples/google-services
The GCM sample code and this tutorial implement the following features:
- Getting the GCM device token: the logic for fetching the device token is implemented as an Android Service. This ensures the distinctiveness and stability of the implementation that contributes to the prevention of unexpected behaviors.
- Receiving the push messages: the reception process is implemented as a Service, so you can implement some time-consuming process (e.g., the logic that will access the network).
- Detecting the device token refresh: the sample will re-register the device token when the token is refreshed on the GCM server.
- Checking the Google Play services installation: the sample will detect unsupported environment and throw an error.
Class structure
The following class diagram shows the implementation of the tutorial code.
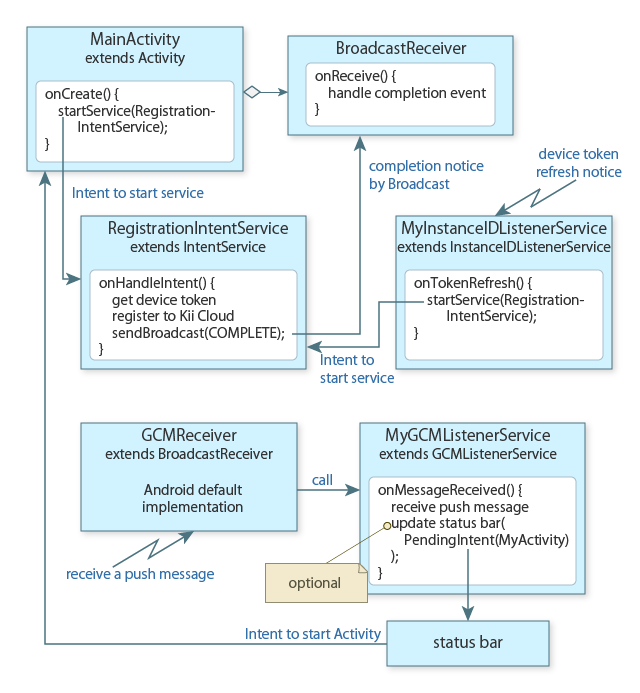
Call the intent to start the Service
RegistrationIntentServiceafter the program launches; the perfect timing to call when using Kii Cloud is after the login is completed. In theRegistrationIntentService, we will get a device token and register it to Kii Cloud.When the
RegistrationIntentServicefinishes the initialization process, it will broadcast the completion (or failure) notice. We can get this completion notice by implementing theBroadcastReceiver.By running a Service as a subclass of the
InstanceIDListenerService, we can get the notification when the device token is refreshed on the GCM server. We can get this notification with theonTokenRefersh()method. In this handler, we will send the intent for starting theRegistrationIntentServiceso that we can start the device token re-registration.We receive a push message with the
GCMReceiverclass. This class is provided by the Android SDK. The message reception handling is delegated to the subclass of theGCMListenerService, following the definition in the AndroidManifest.xml.In the subclass of the
GCMListenerService, we can implement how to handle the push message in theonMessageReceived()method.The Android UI does now show anything when the device receives push notifications. If we want to show something, we need to implement logic to update the status bar as a part of the message handling process. By using the
PendingIntent, we can start the main Activity when a user clicks the status bar.
GCM provides a way to show the notification on the status bar without calling the onMessageReceived() method, but Kii Cloud does not support this method. The onMessageReceived() method will be called always.
Adding the initialization preparation code
Before we install the device token, the target Kii Cloud user must be logged in. The user login is required for binding the user with the device.
The following sample code shows how to process the user login. We will add the sample code in the MainActivity.onCreate() method. After inserting the sample code, import appropriate class libraries (we will add the RegistrationIntentService later, so you can ignore the error for now).
public class MainActivity extends AppCompatActivity {
  private static final int PLAY_SERVICES_RESOLUTION_REQUEST = 9000;

  @Override
  protected void onCreate(Bundle savedInstanceState) {
    super.onCreate(savedInstanceState);
    ......
    if (!checkPlayServices()) {
      Toast.makeText(MainActivity.this, "This application needs Google Play services", Toast.LENGTH_LONG).show();
      return;
    }

    String username = "user1";
    String password = "123ABC";
    KiiUser.logIn(new KiiUserCallBack() {
      @Override
      public void onLoginCompleted(int token, KiiUser user, Exception exception) {
        if (exception != null) {
          Toast.makeText(MainActivity.this, "Error login user:" + exception.getMessage(), Toast.LENGTH_LONG).show();
          return;
        }
        Toast.makeText(MainActivity.this, "Succeeded to login", Toast.LENGTH_LONG).show();
        Intent intent = new Intent(MainActivity.this, RegistrationIntentService.class);
        startService(intent);
      }
    }, username, password);
  }

  private boolean checkPlayServices() {
    GoogleApiAvailability apiAvailability = GoogleApiAvailability.getInstance();
    int resultCode = apiAvailability.isGooglePlayServicesAvailable(this);
    if (resultCode != ConnectionResult.SUCCESS) {
      if (apiAvailability.isUserResolvableError(resultCode)) {
        apiAvailability.getErrorDialog(this, resultCode, PLAY_SERVICES_RESOLUTION_REQUEST)
                .show();
      } else {
        Log.i("PushTest", "This device is not supported.");
        finish();
      }
      return false;
    }
    return true;
  }
}
We are doing three things in the sample code:
- First, we check if the Google Play services are available with the
checkPlayServices()method. If the services are not available, we display an error message and skip the initialization. - We process the Kii Cloud user login. We've created the user with the username
user1and password123ABCwhen we test the Android application in the previous step. If the user login fails, we display an error and skip the initialization. - If the login succeeds, we launch the
RegistrationIntentServicewith thestartService()method.
The checkPlayServices() method is as is shown in the GCM sample. Be careful that this sample includes the implementation to terminate the application with the finish() method.
In a real application, we would implement this logic as follows:
Check the Google Play services availability when the application launches and returns.
Launch the
RegistrationIntentServicewhen the user login succeeds (or a pseudo user is registered, or the login with the access token succeeds) or at any timing after the event.
Adding the initialization code
Next, we will implement the RegistrationIntentService. In this Service, we will execute the initialization logic. The Service will be called by the startService() method in the initialization preparing process and also when the device token is refreshed (this will be explained later).
We will implement the logic as a subclass of the IntentService. Since it runs as a Service, we can use the blocking API.
The following sample code implements the new class:
public class RegistrationIntentService extends IntentService {
  private static final String TAG = "RegIntentService";
  public static final String INTENT_PUSH_REGISTRATION_COMPLETED = "com.example.pushtest.COMPLETED";
  public static final String PARAM_ERROR_MESSAGE = "ErrorMessage";

  public RegistrationIntentService() {
      super(TAG);
  }

  @Override
  protected void onHandleIntent(Intent intent) {
    String error = null;
    try {
      synchronized (TAG) {
        InstanceID instanceID = InstanceID.getInstance(this);
        String senderId = getString(R.string.gcm_defaultSenderId);
        String token = instanceID.getToken(senderId, GoogleCloudMessaging.INSTANCE_ID_SCOPE, null);

        boolean development = true;
        KiiUser.pushInstallation(development).install(token);
      }
    } catch (Exception e) {
      Log.d(TAG, "Failed to complete token refresh", e);
      error = e.getLocalizedMessage();
    }
    Intent registrationComplete = new Intent(INTENT_PUSH_REGISTRATION_COMPLETED);
    registrationComplete.putExtra(PARAM_ERROR_MESSAGE, error);
    LocalBroadcastManager.getInstance(this).sendBroadcast(registrationComplete);
  }
}
We are doing the following things in the sample code:
We get the sender ID (the one we've saved from the JSON file) with the
getString(R.string.gcm_defaultSenderId)method. You can use the debugger to confirm that the value set in thesenderIdis the same as the Sender ID shown in the configuration screen and theproject_numberin the JSON file. If you cannot resolve the symbolR, double check the build.gradle we've set in the previous page.We get the device token from GCM with the
getToken()method.We register this device token to Kii Cloud by calling the
install()method after thepushInstallation()method. The device token is bound to the currently logged-in user (the user needs to be logged in at this timing). We are initializing the push notification in the development environment. If we are to initialize in the production environment, we will set thedevelopmentto false.When the execution is done, we broadcast the completion notice with the name
com.example.pushtest.COMPLETED. We set the error message as the parameter (null if the initialization is successful). We will later implement the handler for receiving this broadcast.This logic could be running simultaneously (upon the initialization and when the device token is refreshed), so we are synchronizing the logic with the
synchronizedstatement with theTAG.
The above sample code is for the Kii Cloud SDK. If you use the Thing-IF SDK, try running this code first and then move to the Modification for Thing-IF section which is a part of the steps for push notification implementation in Android apps with the Thing-IF SDK.
An exception is thrown if the pushInstallation() method is called without any logged-in user. You can retain the logged-in status by means such as Login with the Auto-Saved Credentials in preparation for the process being restarted.
Adding the initialization completion handler
We will implement the logic to finish the push notification initialization in the MainActivity's BroadcastReceiver.
When the push notification initialization in the RegistrationIntentService is completed, this event will be broadcasted with the name com.example.pushtest.COMPLETED. We will write the reception handler for catching this broadcast.
You can implement the BroadcastReceiver anywhere. This time, we implement it in the MainActivity by adding a new mRegistrationBroadcastReceiver in the onCreate() method. We also add the field declaration and the onResume() and onPause() methods.
public class MainActivity extends AppCompatActivity {
  private BroadcastReceiver mRegistrationBroadcastReceiver;

  @Override
  protected void onCreate(Bundle savedInstanceState) {
    super.onCreate(savedInstanceState);
    ......
    mRegistrationBroadcastReceiver = new BroadcastReceiver() {
      @Override
      public void onReceive(Context context, Intent intent) {
        String errorMessage = intent.getStringExtra(RegistrationIntentService.PARAM_ERROR_MESSAGE);
        Log.e("GCMTest", "Registration completed:" + errorMessage);
        if (errorMessage != null) {
          Toast.makeText(MainActivity.this, "Error push registration:" + errorMessage, Toast.LENGTH_LONG).show();
        } else {
          Toast.makeText(MainActivity.this, "Succeeded push registration", Toast.LENGTH_LONG).show();
        }
      }
    };
    ......
  }

  @Override
  protected void onResume() {
    super.onResume();
    LocalBroadcastManager.getInstance(this).registerReceiver(mRegistrationBroadcastReceiver,
            new IntentFilter(RegistrationIntentService.INTENT_PUSH_REGISTRATION_COMPLETED));
  }

  @Override
  protected void onPause() {
    LocalBroadcastManager.getInstance(this).unregisterReceiver(mRegistrationBroadcastReceiver);
    super.onPause();
  }
}
We are doing the following things in the sample code:
- We save the
mRegistrationBroadcastReceiveras a class field. - We add the BroadcastReceiver implementation in the
onCreate()method. Here, we are finalizing the push notification initialization. In the previous step, we've registered the error message in theErrorMessagefield as the Intent parameter. We are extracting the message with thegetStringExtra()method and display the message (or the completion message). - We register the BroadcastReceiver in the
onResume()method. Since we are associating thecom.example.pushtest.COMPLETEDwith themRegistrationBroadcastReceiver, the completion notice sent by theRegistrationIntentServicewill be received by this class. - We are destroying the registered BroadcastReceiver in the
onPause()method.
Adding the device token refresh handling code
We can handle the case when GCM refreshes the device token with the InstanceIDListenerService.
In some occasions, the GCM server refreshes the device token. If this happens, the device needs to get a new token and register it to Kii Cloud.
The token refreshing can be detected as follows. We implement the logic as a new subclass of the InstanceIDListenerService.
public class MyInstanceIDListenerService extends InstanceIDListenerService {
    @Override
    public void onTokenRefresh() {
        Intent intent = new Intent(this, RegistrationIntentService.class);
        startService(intent);
    }
}
In this sample code, we are executing the startService to launch the RegistrationIntentService when the device token refreshment is detected by the onTokenRefresh() method.
The logic is the same as the one after the user login is completed. The push notification re-registration is executed accordingly.
Adding the reception handler
When a device receives a GCM push message, a subclass of the GcmListenerService will be called via the BroadcastReceiver.
We will create a new Class as follows:
public class MyGcmListenerService extends GcmListenerService {
  private static final String TAG = "MyGcmListenerService";

  @Override
  public void onMessageReceived(String from, Bundle data) {
    ReceivedMessage message = PushMessageBundleHelper.parse(data);
    KiiUser sender = message.getSender();
    PushMessageBundleHelper.MessageType type = message.pushMessageType();
    switch (type) {
      case PUSH_TO_APP:
        PushToAppMessage appMsg = (PushToAppMessage)message;
        Log.d(TAG, "PUSH_TO_APP Received");
        break;
      case PUSH_TO_USER:
        PushToUserMessage userMsg = (PushToUserMessage)message;
        Log.d(TAG, "PUSH_TO_USER Received");
        break;
      case DIRECT_PUSH:
        DirectPushMessage directMsg = (DirectPushMessage)message;
        Log.d(TAG, "DIRECT_PUSH Received");
        break;
    }
  }
}
In the sample code, we are recording a message in the debug log based on the type of the push message. In this tutorial, we check if the push message is successfully received by checking the recorded log.
Kii Cloud supports three types of push notifications (PUSH_TO_APP, PUSH_TO_USER, and DIRECT_PUSH). In this tutorial, we will test the push notification by sending a DIRECT_PUSH message from the developer portal.
See Showing a message on the status bar if you want to show a message on the status bar when the push notification is received.
Enhancement for displaying notifications on the screen
If you want to show the result of the push notification reception directly on the user interface, you might need to enhance the application structure. See Showing a message on the status bar if you just want to reflect the result on the status bar.
In this tutorial, the MyGcmListenerService class processes push messages, but you cannot control the user interface directly in a service.
If you want to show the reception result on the screen when the mobile app is active, you can use the Broadcast mechanism as we do with the initialization completion notice. Implement the BroadcastReceiver in the class that will update the user interface, and delegate the UI operation to this class by sending a Broadcast from the service reception logic.
Note that since the message reception logic is running as a Service, you might receive a push message when there is no active Activity.
Running the application
When you are done with the implementation, run the application.
After you launch the application, you should be able to see two messages toasted on the display; the first message is "Succeeded to login" right after the user login is completed, and the second message is "Succeeded push registration" right after the push notification initialization is completed.
If you see an error or no message shows up, check your code with the debugger. Also, double check if the AndroidManifest.xml is edited correctly.
This is all for the implementation. Let us move to the next step: Send Test Messages to check if the push notification really works.
| << Configure the Manifest File | Send Test Messages >> |