Modify the Program
Now that you've done with the tutorial, you can start implementing your mobile app by referring to the Android Programming Guide. As a practice, let's make some modifications to our sample application.
Hello Kii allows you to delete an item by tapping it in the list. Let's modify this function so that the same action will update the content. That is, MyObject n will change to the current time in the HH:mm:ss format when an item is tapped.
The logic to run when an item is tapped in the list is defined in the onItemClick() method of MainActivity.java. We will remove all the codes in the method first.
@Override
public void onItemClick(AdapterView<?> parent, View view, int position, long id) {
}
Copying sample code
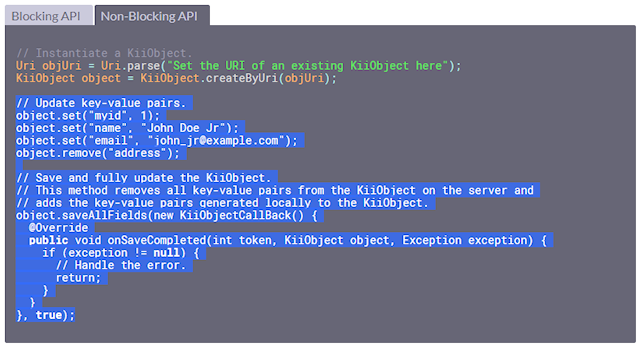
There are several ways for updating KiiObjects. Let us fully update KiiObjects without overwriting check in this tutorial. See Full Update without the Overwrite Check in the programming guide for more information about updating KiiObjects.
The programming guide presents the sample code for the blocking and non-blocking APIs. As we've explained in the tutorial, we will use the non-blocking API since we are not maintaining the worker thread in Hello Kii.
Now, copy and paste the sample code in the programming guide into the source file.
@Override
public void onItemClick(AdapterView<?> parent, View view, int position, long id) {
  // Update key-value pairs.
  object.set("myid", 1);
  object.set("name", "John Doe Jr");
  object.set("email", "john_jr@example.com");
  object.remove("address");

  // Save and fully update the KiiObject.
  // This method removes all key-value pairs from the KiiObject on the server and
  // adds the key-value pairs generated locally to the KiiObject.
  object.saveAllFields(new KiiObjectCallBack() {
    @Override
    public void onSaveCompleted(int token, KiiObject object, Exception exception) {
      if (exception != null) {
        // Handle the error.
        return;
      }
    }
  }, true);
}
After you paste the sample code, add the missing import statements (e.g., for the KiiObjectCallBack class). Android Studio will assist you by presenting an error; typing Alt+Enter will let you add the necessary statement.
Fitting sample code
Next, we fit the sample code.
objectin the sample code is the target KiiObject to update. The tapped KiiObject is obtained frommListAdapter.- The
set()method in the sample code writes a dummy value. Modify the dummy value to the data to use in this tutorial. You can create it with theDateFormatclass of Java.
Now the code looks like this:
@Override
public void onItemClick(AdapterView<?> parent, View view, int position, long id) {
  KiiObject object = MainActivity.this.mListAdapter.getItem(position);

  // Set the key-value pair.
  DateFormat df = new SimpleDateFormat("HH:mm:ss");
  String value = df.format(new Date());

  object.set(OBJECT_KEY, value);

  // Save and fully update the KiiObject.
  // This method removes all key-value pairs from the KiiObject on the server and
  // adds the key-value pairs generated locally to the KiiObject.
  object.saveAllFields(new KiiObjectCallBack() {
    @Override
    public void onSaveCompleted(int token, KiiObject object, Exception exception) {
      if (exception != null) {
        // Handle the error.
        return;
      }
    }
  }, true);
}
Next, we adjust the post-execution logic.
Most of the sample code blocks in the programming guide have no post-execution code inside the callback method. This time, we will add logic to refresh the list in case of successful update and to output a toast message in case of failure.
The final code after adding the post-execution logic will be as follows:
@Override
public void onItemClick(AdapterView<?> parent, View view, int position, long id) {
  KiiObject object = MainActivity.this.mListAdapter.getItem(position);

  // Set the key-value pair.
  DateFormat df = new SimpleDateFormat("HH:mm:ss");
  String value = df.format(new Date());

  object.set(OBJECT_KEY, value);

  // Save and fully update the KiiObject.
  // This method removes all key-value pairs from the KiiObject on the server and
  // adds the key-value pairs generated locally to the KiiObject.
  object.saveAllFields(new KiiObjectCallBack() {
    @Override
    public void onSaveCompleted(int token, KiiObject object, Exception exception) {
      if (exception != null) {
        showToast("Error Updating: " + exception.getLocalizedMessage());
        return;
      }
      mListAdapter.notifyDataSetChanged();
    }
  }, true);
}
Running
Now build and run the code. You should be able to change an object to show the current time by tapping it.
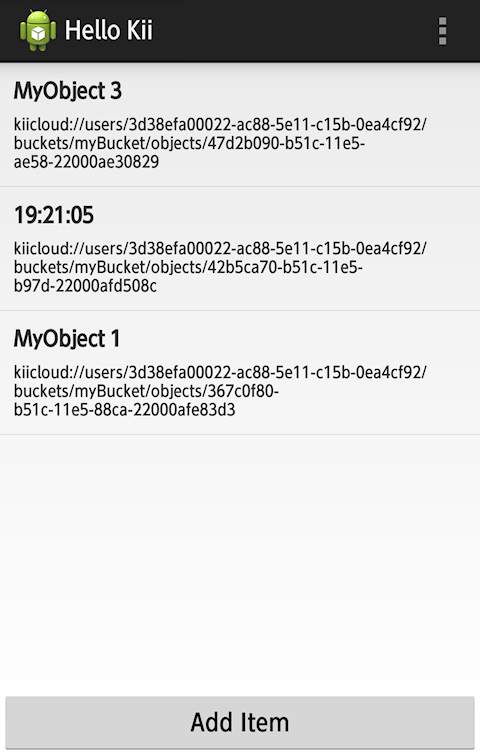
The updated value will be displayed after you log in again because the data on Kii Cloud is also updated.
As we've presented, you can start your implementation by copying the sample code in the programming guide and by adjusting it a bit. By copying the sample code, you will be able to spot the method and the corresponding callback method easily. In this example, the saveAllFields() method and its callback method onSaveCompleted() are called.
If you want to know the specification of the API, you can check the Javadoc. Use them together with the Android programming guide.
What's next?
We will wrap up the tutorial by presenting some hints to understand Kii Cloud. We will also introduce some features that will be useful when implementing some real mobile apps.
Go to Hints for Next Step.