Index.html Implementation
We will look into the index.html file that is loaded first in the Web app.
This page defines these three steps in the listed order:
Loading the scripts and the style sheet
Initializing the SDK
Generating the contents
Loading the scripts and the style sheet
The <head> element at the top of the HTML file loads the JavaScript source file of the Kii Cloud SDK, the two JavaScript source files which implement features for each screen and the style sheet.
Each file is embedded as below:
<script type="text/javascript" src="html5-cloud-sdk-v2.4.2.js"></script>
<script type="text/javascript" src="login-page-callback.js"></script>
<script type="text/javascript" src="list-page-callback.js"></script>
<link rel="stylesheet" href="hellokii.css" />
As described already, Hello Kii implements the same features in the callback version and the promise version. In this sample, the callback version of the JavaScript files are referenced as the login-page-callback.js file and the list-page-callback.js file are configured.
Note that the Kii Cloud SDK is also loaded with the <script> tag. Even when you develop your own Web app, you need to distribute or publish the downloaded Kii Cloud SDK as a part of your Web app.
Initializing the SDK
The below script is defined in the <head> element. This script is automatically executed when the HTML page is loaded because it is set as the handler of the window.onload event. The Kii Cloud SDK is initialized here.
<script type="text/javascript">
  // Initialize the page.
  window.onload = function() {
    // Initialize the Kii Cloud SDK.
    Kii.initializeWithSite("12345678", "abcdef0123456789abcdef0123456789", KiiSite.JP);
  }
</script>
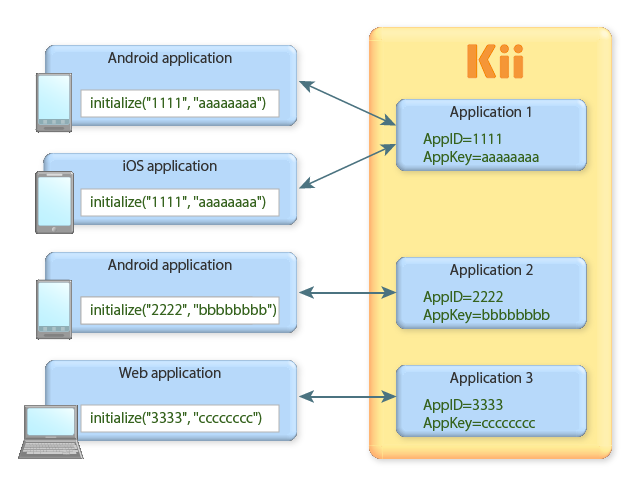
Kii.initializeWithSite() method initializes the SDK. It has three parameters: AppID, AppKey (an arbitrary value), and the server location of the application in order.
There are many applications created by numerous developers on Kii Cloud. To distinguish the applications, Kii Cloud uses the AppID. This value is generated when you create your application on the developer portal.
As illustrated in the figure below, the AppID is to be set in the initialization process of the mobile app. By setting the same AppID, application data and users can be shared across multiple platforms; in the figure, the Android and iOS applications are sharing the same application data and users by using the same AppID 1111.
When you download Hello Kii application from the developer portal, the unique AppID and AppKey for you are assigned and embedded in the ZIP file automatically. When you open the project, you will find the initialization code, like the one shown at the top of this page, is already embedded.
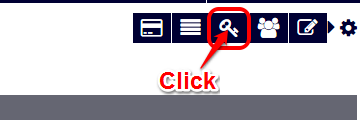
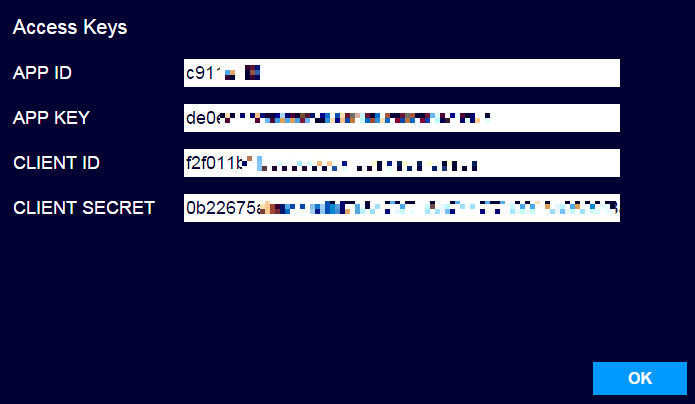
If you are creating a new project, you need to embed the AppID and AppKey by yourself. To check the AppID, click the gear icon at the upper-right corner of the developer portal to expand the menu icons and click the key icon. The AppID will pop up as follows:
Reminder
It is not possible to attack your application by knowing its AppID. If a malicious user obtains your application's ClientID and ClientSecret, however, they will be able to access all of your application data as the app administrator. The ClientID and ClientSecret, therefore, need to be secured just like the login password of the developer portal.
When you are sending a question to Kii support team, you only need to provide the AppID and server location.
Generating the contents
Finally, the HTML page is defined in the <body> element.
In this tutorial, both of the login and data listing screens are written in the <div> elements. Screen transition is achieved by switching the display property of the style attribute of each <div> element.
The below outlines the defined contents. Each of the three <div> elements respectively defines the header part, the login screen, and the data listing screen. Transition between the login-page division and the list-page division is achieved by switching the display property of the style attribute.
<body>
  <div class="app-header">
    Hello Kii
  </div>

  <div id="login-page" class="app-body">
    ...... contents of the user login screen ......
  </div>

  <div id="list-page" class="app-body" style="display: none">
    ...... contents of the data listing screen ......
  </div>
</html>
This mechanism for screen transition is simplified to explain Hello Kii. It would not address requirements of general Web services. Perform page transition by using frameworks in your development of a real-world Web app.
What's next?
Let's check how the login screen is implemented. We will explain how the APIs are used.
Go to Login Screen Implementation.
If you want to learn more...
- See JavaScript Quick Start to learn how to develop a new mobile app.
- See Security to learn more about security. The topic explains why a malicious third party cannot attack your application by knowing its AppID.